Standard mailbox
The standard mailbox is designed for use as a typical user mailbox.
It can take messages (after playing a personal greeting), turn the extension's message light on when receiving a new message (and turn it off after all new messages have been reviewed), send verbal or pager notifications for new messages, and even provide additional routing or service options to callers through an associated single digit action (SDA) menu that is active while the personal greeting is being played. Messages can be reviewed, saved, forwarded, replied to, deleted and (with some limitations) undeleted. Messages can also be recorded and sent to other mailboxes in the system directly from the subscriber menu.
Depending on configuration of the associated class of service (COS), a standard mailbox may also be able to save messages to archive folders (rather than just a single saved message queue), and may be able to custom configure notification settings. It may also be able to enable or disable call blocking (DND), enable or disable call screening, re-enable the new user tutorial and/or configure other advanced user settings.
Review messages
The primary purpose of a standard mailbox is to receive messages, both from other users and from outside callers, and to provide a way for the mailbox owner to review and manage the messages received. The flowchart below provides a simplified overview of the message review options; note that the options available while a message is playing differ from those available after the message has finished playing.
The order of message playback depends on the class of service (COS) assigned to your mailbox (which is managed by the system administrator). By default, messages are played first-in, first-out (FIFO); that is, the oldest message is played first. However, the COS can be configured such that messages are played last-in, first-out (LIFO); that is, the newest message is played first. Whichever order is used, the system will play the first message and then wait for a DTMF response from the subscriber. Once the message has been acted on by the subscriber, the system will proceed to the next message in the queue, repeating this process until all messages have been listened to and acted upon (unless the subscriber backs out of the message review by pressing the * key or by disconnecting).
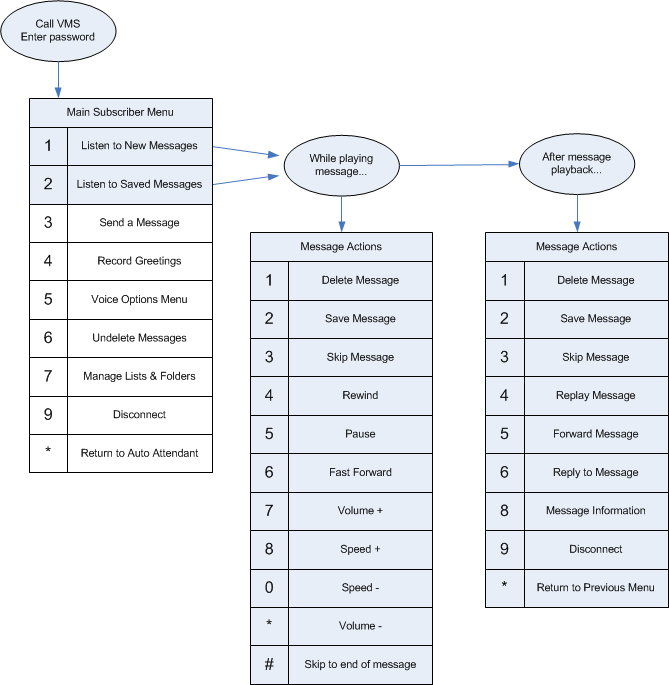
Message Actions During Playback
The actions available while the message is playing differ somewhat from those available after the playback is completed. This is because there are certain actions (such as those for changing the volume level) that are only relevant during playback.
| Option | DTMF | Description |
|---|---|---|
| Delete message | 1 | Moves the message to the deleted queue, where it will remain for a limited period of time before being permanently erased (default is 24 hours). |
| Save message | 2 | Moves the message to the saved queue. If archiving is enabled, it will prompt you to enter a folder number and will then move the message to that folder. |
| Skip message | 3 | Skips to the next message, leaving the current message in the queue. |
| Rewind | 4 | Rewinds message playback by several seconds (default is 30 seconds). |
| Pause | 5 | Pauses message playback for a few seconds (default is 5 seconds). |
| Fast forward | 6 | Fast forwards message playback by a few seconds (default is 5 seconds). |
| Volume +, Volume - | 7, * | Increases or decreases the volume. |
| Speed +, Speed - | 8, 0 | Increases or decreases the playback speed. |
| Skip to end of message | # | Halts message playback so that the after-playback menu becomes available. |
Message Actions After Playback
Once the message has finished playing, the options that are only relevant during playback are no longer available. Instead, additional options for what to do with the message itself become available.
| Option | DTMF | Description |
|---|---|---|
| Delete message | 1 | Moves the message to the deleted queue, where it will remain for a limited period of time before being permanently erased (default is 24 hours). |
| Save message | 2 | Moves the message to the saved queue. If archiving is enabled, it will prompt you to enter a folder number and will then move the message to that folder. |
| Skip message | 3 | Skips to the next message, leaving the current message in the queue. |
| Replay message | 4 | Replays the current message from the beginning. |
| Forward message | 5 | Forwards the message to one or more recipients, with or without comments. Other recipients can include both individual mailboxes and/or a personal distribution list (when entering recipients, press * and then the distribution list number). You cannot forward to any mailbox that cannot receive messages, including any system mailbox. You also cannot forward a message that is marked private. |
| Reply to message | 6 | Prompts you to record a response to the message and sends it back to the original sender. This option is only available if the sender was another user; you cannot reply to outside callers. |
| Message information | 8 | Plays a detailed history of where the message came from and when it arrived. For messages from outside callers, the caller ID may be played if it is available, otherwise the system will just say that it was from an outside caller. Forwarded messages include information about when the original message was recorded. |
Send messages
The flowchart below provides a basic overview of how to send a message from a standard subscriber menu, including how to enter one or more destinations and how to set message sending options and then send the message.
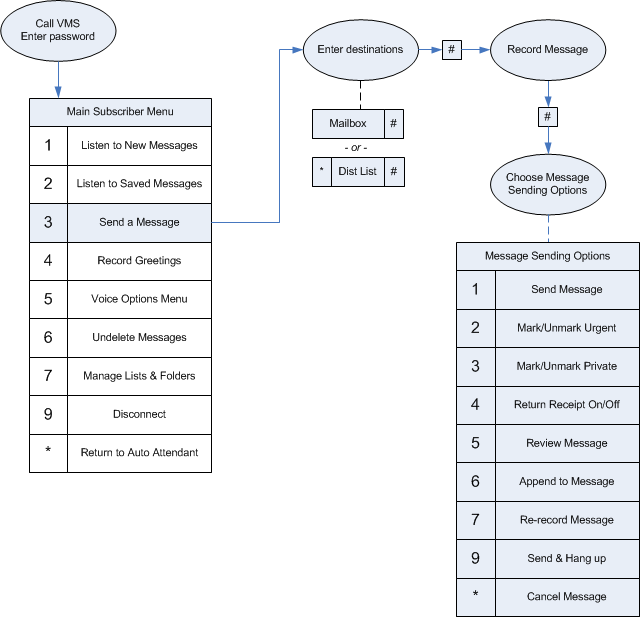
To send a message (from the main subscriber menu):
- Press
3to send a message. - Enter a destination. Either enter a valid mailbox number or press
*and enter a personal distribution list number (from 1 to 9). - Press
#. - Repeat steps 2 and 3 for any additional destinations.
- Press
#to continue. - At the tone, record your message. When you are finished, press
#. - Press
1to send and return to the main menu -or-
Press9to send and hang up -or-
For other options, refer to the table below.
Message Sending Options
After you have recorded the message, there are several actions you can take:
| Option | DTMF | Description |
|---|---|---|
| Send message | 1 | Send the message immediately, as is, to all valid destinations, then return to the main subscriber menu. |
| Mark/Unmark urgent | 2 | Enable or disable urgent status for this message. |
| Mark/Unmark private | 3 | Enable or disable private status for this message. |
| Return receipt on/off | 4 | Enable or disable return receipt for this message. |
| Review message | 5 | Replay the message. |
| Append to message | 6 | Continue recording, appending to the end of the message. |
| Re-record message | 7 | Erase the message and start recording again. |
| Send and hang up | 9 | Send the message immediately, as is, to all valid destinations and then disconnect the call. |
| Cancel message | * | Erase the message and return to the main subscriber menu. |
Record greetings
This flowchart provides an overview of how to record (or re-record) the name and personal greeting(s) for a standard mailbox.
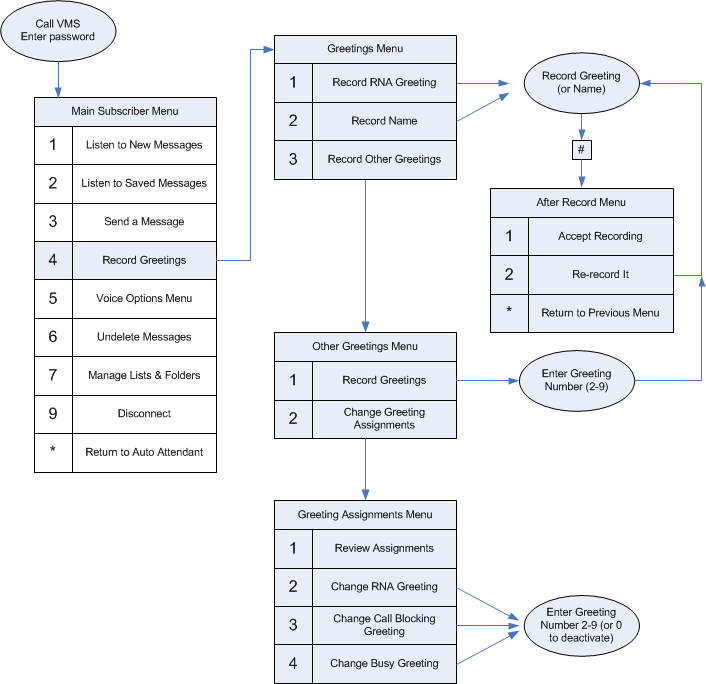
Record RNA Greeting
This option allows you to re-record your ring-no-answer (RNA) greeting, the greeting you recorded as part of the new user tutorial, which is played when your phone rings but you do not answer it. For ease of use, standard mailboxes default to using this greeting in all situations: RNA, busy and DND (Do Not Disturb). That way you don't have to worry about multiple greetings unless you want them.
To record the RNA greeting (from the subscriber main menu):
- Press
4to record greetings. - Press
1to record the RNA greeting. - System plays the current recording.
- Press
1to accept the recording (and return to the greetings menu) -or-
Press2to re-record it. - At the tone, record your greeting. When finished, press
#. - Repeat from step 3 until you accept the recording.
Record Name
This option allows you to record your name for the spell-by-name directory. If you do not have a name recording, your mailbox will not appear in the directory.
To record the your name (from the subscriber main menu):
- Press
4to record greetings. - Press
2to record your name. - System plays the current recording.
- Press
1to accept the recording (and return to the greetings menu) -or-
Press2to re-record it. - As the tone, record your name. When finished, press
#. - Repeat from step 3 until you accept the recording.
Record Other Greetings
The 7.00 provides all standard subscriber mailboxes with eight greetings, numbered 2 through 9 (greeting 1 is reserved for the name recording). By default, greeting 2 is used for the RNA greeting (when you go through the new user tutorial). The options presented in this menu allow you to re-record any of the eight greetings and to assign any of them to one of three possible uses: RNA, busy or call blocking (DND).
The RNA greeting is the one that is used most frequently, as many switches offer multiple line appearances (so that a busy condition never really occurs, even if the subscriber is on the phone). For most cases, then, it is far easier to just use the RNA greeting and not bother with recording multiple greetings. Nevertheless, the option is there for those who need the flexibility.
Record mailbox greetings
To record a specific greeting number (from the subscriber main menu):
- Press
4to record greetings. - Press
3to record the other greetings. - Press
1to record greetings. - Enter the greeting number, from 2 to 9. Or press
*to exit back to the Other Greetings menu. - System plays the current recording.
- Press
1to accept the recording (and return to step 4) -or-
Press2to re-record it. - As the tone, record your greeting. When finished, press
#. - Repeat from step 5 until you accept the recording.
Change greeting assignments
The Greetings Assignments menu always you to review or change which greeting numbers are assigned to the RNA, busy and call blocking (DND) greetings.
Review greeting assignments
From the subscriber main menu:
- Press
4to record greetings. - Press
3to record the other greetings. - Press
2to change greeting assignments. - Press
1to review assignments.
Change RNA/Busy/Call blocking greeting
From the subscriber main menu:
- Press
4to record greetings. - Press
3to record the other greetings. - Press
2to change greeting assignments. - Press
2to change the RNA greeting -or-
Press3to change the call blocking greeting -or-
Press4to change the busy greeting. - Enter the greeting number, from 2 to 9, you wish to assign. Or enter
0to deactivate the selected greeting.
Change mailbox settings
The flowchart below provides an overview of how to configure additional subscriber settings and features; most of these options are dependent on your mailbox's class of service, so not all options may be available in your mailbox.

Call Blocking
Call blocking (DND) prevents callers from transferring to the your extension from the auto attendant; it does not affect direct extension-to-extension calls. If the class of service is configured to allow it, you may use this option to turn call blocking on or off.
Call Screening
Call screening records the caller's name before attempting the transfer so that it can announce the caller to the you and give you the chance to accept or reject the call. If the class of service is configured to allow it, you may use this option to turn call screening on or off.
Change Notifications
This option is only available if the class of service permits it. It allows you to modify your custom notification templates (global templates can only be edited by the administrator). The following flowchart gives a brief overview of this process.
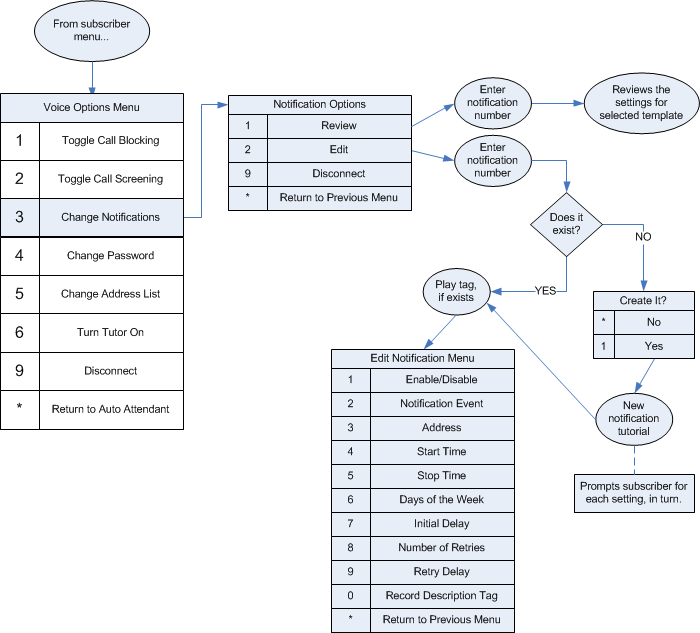
By default, subscribers are not allowed to edit their notifications, but the system administrator can change that. If enabled, this option allows you to edit any of the ten possible custom templates, numbered 0 through 9.
Review a template
From the main subscriber menu:
- Press
5to change mailbox settings. - Press
3to change notifications. - Press
1to review the settings. - Enter the notification number to review, from 0 to 9.
- The system will review the settings for the selected notification or inform you if it does not exist.
Edit a new template
From the main subscriber menu:
- Press
5to change mailbox settings. - Press
3to change notifications. - Press
2to edit the template. - Enter the notification number to edit, from 0 to 9, that is not already in use.
- Press
1to create it. If you press*to cancel, you will be returned to the notification options menu (step 3). - The system will guide you step by step to configure each setting for the notification.
- When the tutorial is complete, you will be prompted to record a description for the template.
- Once you accept the recording, you will return to the notification options menu (step 3).
Edit an existing template
If you opt to edit a template that already exists, then instead of the tutorial mode you will be presented with the menu shown in the flowchart above. This allows you to edit only the setting(s) you want to change.
From the main subscriber menu:
- Press
5to change mailbox settings. - Press
3to change notifications. - Press
2to edit the template. - Enter the notification number to edit, from 0 to 9.
- Select the setting to change and follow the prompted instructions to do so. Repeat for any other settings you wish to change.
In brief, the notification settings are:
| Setting | Description |
|---|---|
| Enable/Disable | Enables (or disables) the template. |
| Notification Event | Determines what event triggers the template: all new messages, urgent message only or relay page. |
| Address | Specifies the address used to create the dial string. Can be any valid telephone or pager number, or email address. |
| Start Time & Stop Time | Specifies the time period during which the template is active. |
| Days of the Week | Specifies the days of the week on which the template will be active (for the time period defined by the start and stop times). |
| Initial Delay | Specifies how long after the triggering event to wait before making the first notification attempt (in minutes). |
| Number of Retries | Specifies how many times to retry the notification if it fails. |
| Retry Delay | Specifies how long to wait between retries (in minutes). |
| Record Description Tag | Allows you to record a descriptive name for the template, which can be helpful when editing templates over the phone. |
Change Password
You may use this option to change the password for the mailbox.
From the main subscriber menu:
- Press
5to change mailbox settings. - Press
4to change the password. - Enter the new password and press
#. Password cannot be 0 and must be at least 1 digit (actual minimum length depends on the class of service). - Re-enter the same password and press
#. - If the password is valid, it will be changed immediately.
Change Address List
This option allows you to edit your phone, pager and email addresses. Other address types can only be edited by the system administrator.
The flowchart below gives a brief overview of the available options.
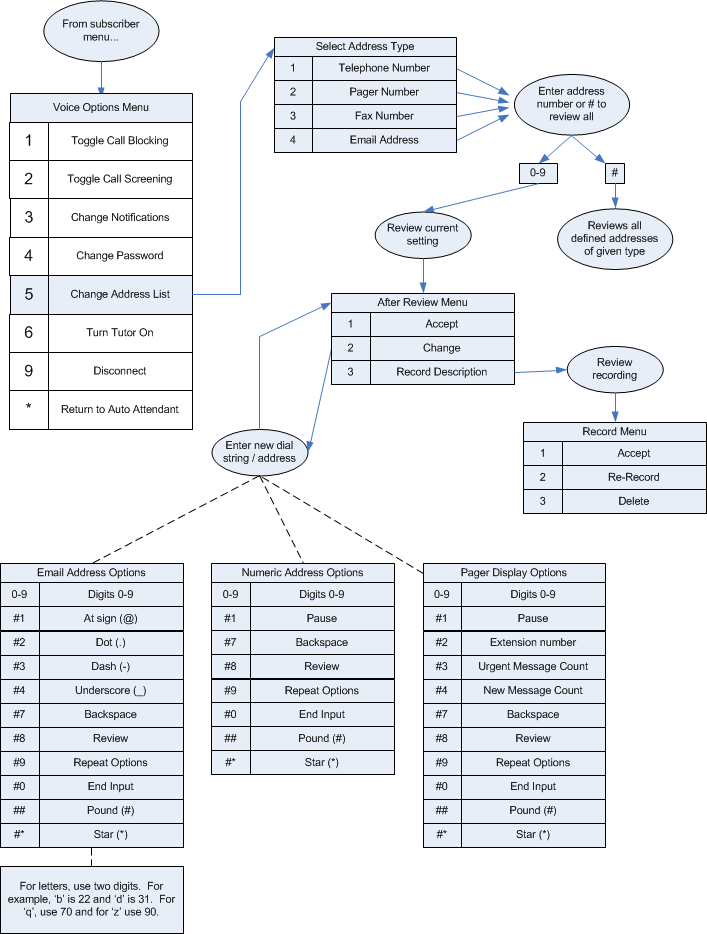
Phone addresses
Phone number addresses must be valid dial strings. They may contain any of the valid DTMF digits (0-9, *, #) as well as pauses (represented by commas). When you choose to edit one of these addresses, you will enter the address using the middle chart shown above, labeled Numeric Address Options.
As shown, there are special codes for non-numeric DTMF as well as certain actions:
- To add a pause, press
#1 - To delete the last digit entered, press
#7 - To review the entries so far, press
#8 - To repeat the list of special options, press
#9 - To add a #, press
## - To add a *, press
#* - To end input, press
#0
Just entering a single # will repeat the original instructions and entering just a * will cancel the edit.
Pager addresses
Pager number addresses, like phone addresses, must be valid dial strings. They are entered using the same instructions and options as described for phone addresses. The only difference is that after you have entered and accepted the pager number, you will be prompted to enter the pager display string as well. When entering this string, use the Pager Display Options chart shown above.
The pager display options are the same as those for entering the pager number, except with these additional options:
- To add a marker for including your extension number, enter
#2 - To add a marker for including the urgent message count, press
#3 - To add a marker for including the new message count, press
#4
These 'markers' will be replaced with the actual values just before the pager number is dialed for a notification.
Email Addresses
The process for entering an email address is necessarily a bit more cumbersome. In order to allow you to enter alphabetic characters, the system requires two keypresses for each character dialed, based on the standard telephone keypad. Thus, to enter the letter 'A', you must press the digits 21. To enter a letter 'B', press 22. And so forth. Since the letters 'Q' and 'Z' are not always marked on the keypad, use 70 for 'Q' and 90 for 'Z'. To enter a number 0-9, press the corresponding digit and then press #.
As shown in the Email Address Options chart, above, there are special codes for entering symbols:
- To add an at sign (@), press
#1 - To add a dot, press
#2 - To add a dash, press
#3 - To add an underscore, press
#4 - The options for backspace, review, help, pound, star and to end input are all the same as for the other addresses.
Turn Tutor On
You may use this option to re-enable the new user tutorial. The next time you log in, you will be led through the new user tutorial again.
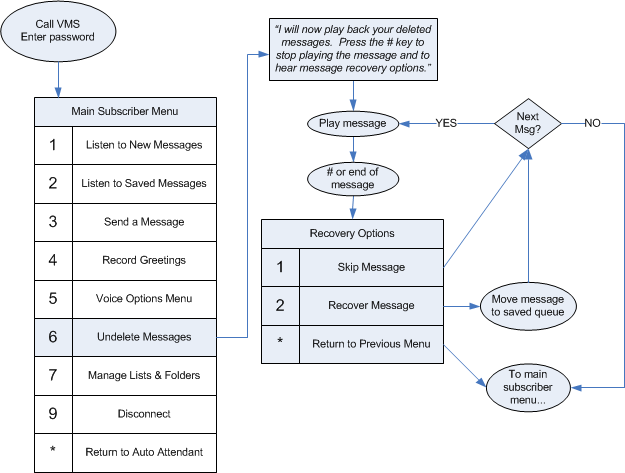
Undelete messages
When you delete a message from your mailbox, the message is moved to the Deleted message queue but is not actually deleted from the system hard drive for a certain period of time. Within that time period, it is possible to review and retrieve the message using the undelete function, a useful feature if you delete a message by mistake. After that time period has passed, the message is erased and cannot be retrieved.
The following flowchart provides an overview of the undelete process.
Manage lists and folders
Distribution lists provide a convenient way to send messages to several people at once without having to enter all of their mailbox numbers each time you want to send a message.
The 7.00 provides two kinds of distribution lists: global and personal. Global lists are tied to a special kind of mailbox called a distribution mailbox; anyone who knows the mailbox number can transfer to that mailbox and leave a message that will be distributed to everyone in the mailbox's associated distribution list. However, distribution mailboxes can only be created and managed by the system administrator. So the 7.00 also provides personal distribution lists that can be created and managed by individual users from within their own standard subscriber mailboxes.
The 7.00 also offers an optional feature called message archiving. In the normal configuration for standard mailboxes, every message you save is placed in a saved message queue that you can access by selecting the option to listen to saved messages. However, some users may wish to separate their saved messages into different categories; the 7.00 supports this by providing the message archiving feature. When message archiving is enabled for your mailbox, every time you save a message the system will ask you in which archive folder to store the message. You can have up to nine archive folders (numbered 1 through 9), and you can record a folder name for each one. This feature is optional and must be enabled by your system administrator.
The flowchart below describes the menu options for managing both personal distribution lists and archive folders.
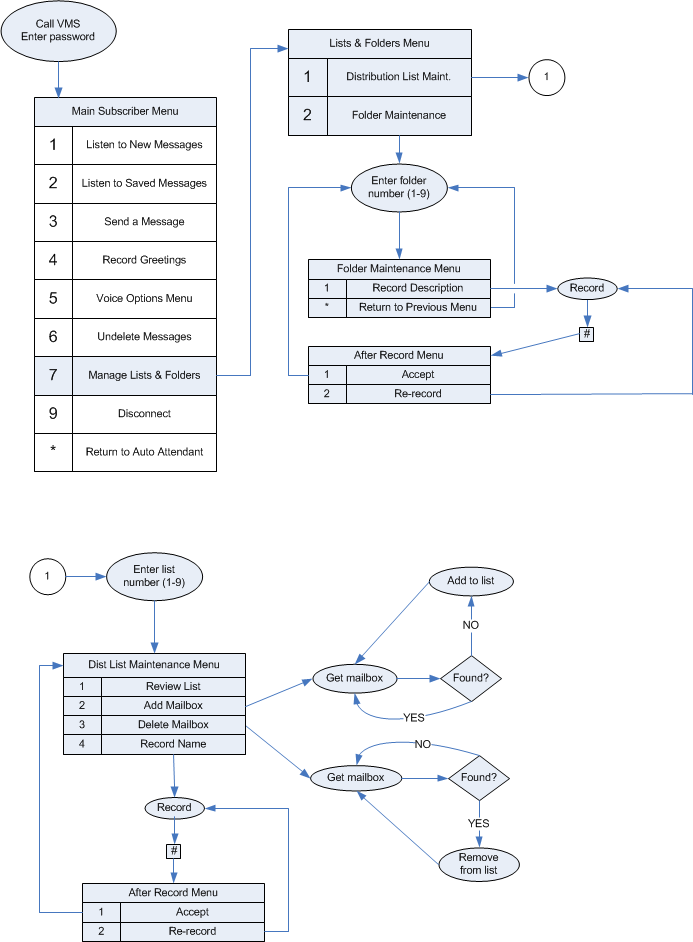
Distribution List Maintenance
Personal distribution lists are usable by the subscriber only; no one else can edit or use these lists. If you need a global distribution list that can be used by others as well, you will need to ask your system administrator to create a distribution mailbox.
For each personal list, numbered 1 through 9, you can record a descriptive name and can add and remove mailboxes as shown in the flowchart above. Any mailbox that can receive messages (including distribution mailboxes) can be added to the list. The system will resolve the lists for any included distribution mailboxes prior to sending the message (and will ensure that there is no looping and that no mailbox gets more than one copy of the message).
Review list
To review a distribution list (from the subscriber main menu):
- Press
7to manage lists and folders. - Press
1for distribution list maintenance. - Enter the distribution list number, from 1 to 9.
- Press
1to review the list.
Add mailbox
To add mailboxes to a distribution list (from the subscriber main menu):
- Press
7to manage lists and folders. - Press
1for distribution list maintenance. - Enter the distribution list number, from 1 to 9.
- Press
2to add a mailbox. - Enter a valid mailbox number. If it is valid and not already in the list, it will be added.
- Repeat step 5 for each additional mailbox you want to add.
- When finished, press
*to return to the distribution list maintenance menu (step 4).
Delete mailbox
To delete mailboxes from a distribution list (from the subscriber main menu):
- Press
7to manage lists and folders. - Press
1for distribution list maintenance. - Enter the distribution list number, from 1 to 9.
- Press
3to delete a mailbox. - Enter a valid mailbox number. If it is valid and is found in the list, it will be removed.
- Repeat step 5 for each additional mailbox you want to remove from the list.
- When finished, press
*to return to the distribution list maintenance menu (step 4).
Record name
To record a descriptive tag for a distribution list, follow these steps (from the main subscriber menu):
- Press
7to manage lists and folders. - Press
1for distribution list maintenance. - Enter the distribution list number, from 1 to 9.
- Press
4to record a name. - Record the name or description. When finished, press
#. - System will play back the recording.
- Press
1to accept the recording -or-
Press2to re-record it (this will skip back to step 5).
Archive Folder Maintenance
Archive folders allow the subscriber to have up to nine different saved message folders instead of just one.
Record description
To record a descriptive tag for an archive folder, follow these steps (from the main subscriber menu):
- Press
7to manage lists and folders. - Press
2for folder maintenance. - Enter the folder number, from 1 to 9.
- Record the description. When finished, press
#. - System will play back the recording.
- Press
1to accept the recording -or-
Press2to re-record it (this will skip back to step 4).