End User Training
This section gives an overview of the subjects you should cover during end user training.
New User Tutorial
By default, all mailboxes (except those of type guest) have a new user tutorial that the mailbox owner must go through the first time he or she logs into the mailbox. The tutorial leads the user through the process of selecting a new password, recording a name for the spell-by-name directory, and recording a personal greeting to play when the extension is forwarded to voice mail. The nature of what the mailbox owner records for the name and greeting may vary depending on the type of mailbox.
The tutorial is disabled by default for guest mailboxes; however, the system administrator can enable the tutorial for any class of service, including one being used by guest mailboxes (such as for extended-stay guests).
For any mailbox where the tutorial is not already disabled, the initial login will proceed according to the following steps.
- When prompted, enter the initial, default password, which is typically
1234. - Following the instructions provided, enter your new password and press
#. - To confirm your entry, re-enter the same password and press
#. - If this is a QA mailbox, you are finished. QA mailboxes do not use the personal greeting.
- When prompted, record your name (or a brief descriptive name reflecting the mailbox's purpose). When finished, press the
#key. - Press
1to accept the recording. - Record the personal greeting (or whatever you want the mailbox to play when a caller is routed to the mailbox for any reason). When finished, press the
#key. - Press
1to accept the recording. - The tutorial is now complete.
After completing the tutorial successfully, the system will disable the tutorial so that the next time the user logs into the mailbox it will not repeat the tutorial process.
What you record for the name and greeting may vary slightly from what is shown above depending on the mailbox type and its intended use. The following table suggests possible recording options based on mailbox type (if a guest mailbox has the tutorial enabled, the typical use would be the same as for standard mailboxes).
| Mailbox Type | Name Recording | Personal Greeting |
|---|---|---|
| Distribution | Group or purpose represented by the distribution list. | Appropriate instructions for leaving a message. |
| Group | Group or purpose represented by the group list. | Appropriate instructions for leaving a message. |
| QA | (n/a) | (n/a) |
| Standard | Subscriber's name. | Appropriate instructions for leaving a message, plus any relevant SDA menu options. |
| System | Purpose for which mailbox is used. | Information and/or SDA menu options (if relevant). Content depends on the purpose for which the mailbox is being used. |
Although some mailboxes may be hidden from the spell-by-name directory per the assigned class of service, it may still be useful to record a 'name' for each of them. In certain situations, the system will play the name recording as confirmation of user input, such as when a standard subscriber uses the Send Message feature in the subscriber mailbox menu to send a message to another mailbox.
Messaging
There is no limit on the total number of messages the system can hold, only on how much space they can occupy. The maximum storage time depends on the size of the hard drive, and in modern systems easily exceeds 500 hours. By default, each message is limited to 5 minutes, but this limit can be raised or lowered by editing the appropriate class of service (COS) template. Callers also may be able to exceed the limit by appending to their message before sending it.
Message Queues
The 7.00's voice messaging subsystem supports up to three different message queues for each mailbox.
| Queue | Description |
|---|---|
| New | All incoming messages are placed in this queue. When listening to messages in this queue, urgent messages are always played first, then normal messages. If message waiting notifications are enabled, the message light will remain on as long as there are any messages in this queue. Messages remain in the New queue until they are explicitly saved or deleted. |
| Saved / Archived | If message archiving is disabled in the COS, all saved messages are stored in the Saved queue. If message archiving is enabled, then every time the user saves a message, he or she will be prompted to select which archive folder to store the message in. There are nine archive folders, numbered 1 through 9. |
| Deleted | When a message is deleted, it is stored in the deleted queue. The system then schedules a “message deletion” event for that message. Typically, this event is scheduled to execute 24 hours after the subscriber deleted the message. During this time period, the subscriber may use the undelete action to retrieve the message; once the event is executed, however, the message is erased from the system and cannot be retrieved. This does not apply to guest mailboxes; for that mailbox type, deleted messages are stored in one of the unused archive folders and, when the guest checks out, those messages along with any new or saved messages still in the mailbox will be archived for up to a week (and possibly longer). A method of accessing these messages is available to the operator. |
While availability of archived message folders is determined by the COS, mailboxes of type guest do not have access to archive folders or the deleted queue, regardless of the COS settings.
Message Types
Depending on the COS settings, voice messages may be marked with different attributes that control when or how they are played, how they are stored, or what the recipient can do with them.
| Type | Description |
|---|---|
| Normal | Any message not marked urgent. Normal messages play after urgent messages and can be forwarded without restriction. |
| Urgent | Any message marked urgent by the sender. Urgent messages play before normal messages. Once a message is saved or deleted, it loses the urgent status and becomes a normal message. |
| Private | Any normal or urgent message that has been marked private by the sender. Private messages cannot by forwarded. Saving or deleting a private message does not remove its private status. |
| Return Receipt | Any message may be marked for return receipt. A return message is auto-generated when the recipient listens to the message for the first time. Once the receipt has been sent, the return receipt status is removed from the message. |
Voice Mail Access
There are generally four ways a subscriber may access his or her mailbox to retrieve messages:
- From the subscriber's own extension: Enter the password only.
- From another extension: Press
**, then enter the password. - From the auto attendant greeting: Press
*, enter the mailbox number and press#, then enter the password. - From the subscriber's personal greeting: Press
*, then enter the password.
From Your Own Extension
This is the method you would use when accessing your mailbox directly from your office telephone, assuming that the extension number assigned to your telephone is also associated with your voice mailbox (which is typically the case).
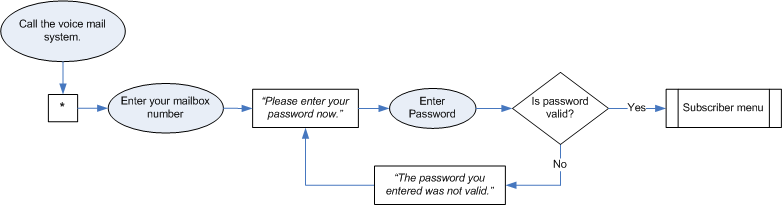
From Another Extension
Accessing your voice mail from another extension is similar to accessing it from your own extension, but there are a couple extra steps required, as shown in the figure below.

As shown, the system thinks you are logging into the mailbox associated with the extension you are calling from, so you first have to exit back to the main auto attendant greeting (by pressing the * key), then tell the system which mailbox you actually want to log into (by pressing the * key again, followed by entering your mailbox number). From that point on, the process is the same as logging from your own extension.
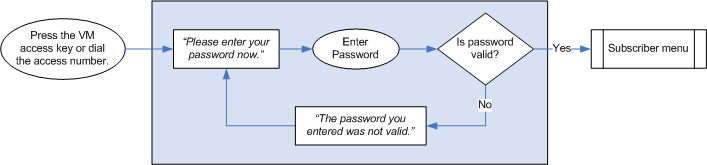
From the Auto-Attendant Main Greeting
If you do not have a DID number that routes directly to your mailbox and you call in from the outside, your call may be answered by the auto attendant (or by a live operator who can then transfer you into the auto attendant). To access your mailbox in this situation, follow the steps shown below.
First you have to press the * key and enter your mailbox so the system knows which mailbox you want to log into. Then enter your password (if prompted).
From Your Mailbox's Personal Greeting
If you happen to have a DID number that routes directly to your office extension and you call it from an outside line, you will be routed to your mailbox's personal greeting. To access your voice mail, follow these steps:

While your greeting is playing, press the * key to indicate you want to log in, then enter your password when prompted.
Subscriber Menus
The following sections describe the subscriber menu options available to you depending on the type of mailbox you are logging into. Note also that the class of service (COS) assigned to your mailbox will also affect which options are available to you–not all options are available to all mailboxes.
| Mailbox Type | Description |
|---|---|
| Distribution | Non-user mailbox intended to distribute incoming messages to multiple users. Does not store messages itself. |
| Group | Non-user mailbox intended to distribute incoming messages to multiple guests; also supports options for setting wakeup calls for multiple guests. Messages are stored and will be forwarded to new members as they are added and checked in. |
| Guest | User mailbox assigned to guest rooms in a hospitality system. |
| QA | Special-purpose mailbox that uses a question-and-answer format to elicit multiple responses from a caller. |
| Standard | User mailbox, typically assigned to all users in a business system or to employees in a hospitality system. |
| System | Non-user mailbox typically used either to provide information or used with single-digit action menus to provide routing to other mailboxes or services. The main auto attendant mailbox, for example, is typically a system mailbox. |