System Configuration
System Configuration is used to modify almost all configuration settings that do not directly relate to mailboxes (configuration of mailboxes and related items is handled by the Mailbox Administration utility). The utility can be accessed by clicking on the Start button and then selecting All Programs | DuVoice | System Configuration (in Windows 7; in other versions of Windows, this may differ).
A shortcut to the utility may be placed on the desktop, in the Start menu, and/or pinned to the taskbar, thereby making the application more readily accessible. Depending on your selections in the Install wizard, shortcuts to System Configuration and other commonly-used applications are placed in the context menu (accessed by right-clicking on the desktop), as shown below:
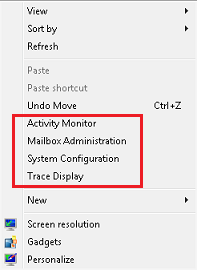
The context menu may vary depending on the version of Windows installed.
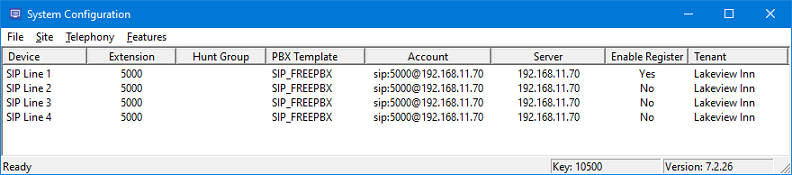
The figure below is an example of what the System Configuration main window may look like on a SIP-enabled system:
Display
The main section of the window displays the following information (note that some columns are only displayed if it is running on a SIP-enabled system):
| Column | Description |
|---|---|
| Device | Specifies a particular voice line and type. |
| Extension | Specifies the extension number associated with the given line. On SIP-enabled systems, this must be set correctly for the integration to work. On non-SIP systems, whether this field is required depends on the PBX. |
| Hunt Group | Specifies the hunt group associated with the given line. On SIP-enabled systems, this must be set correctly for the integration to work. |
| PBX Template | Specifies the PBX integration template used for the given line. |
| Account | Specifies the user account to use when registering with the PBX. If the PBX does not require login, this field will be blank. For SIP-enabled systems only. |
| Server | Specifies the IP address of the SIP registrar with which the SIP ports are registered. Typically, this will be the IP address of the SIP PBX. For SIP-enabled systems only. |
| Enable Register | If checked, the given port will register with the PBX (or DMG). For SIP-enabled systems only. |
| Tenant | The default tenant to be used when an incoming call cannot be directed to a specific mailbox or extension but instead must be sent to the auto attendant or operator. |
Menus
System Configuration menu options are divided into the following categories: File, Site, Telephony, and Features. There is also a right-click context menu.
File Menu
The File menu provides a single option, to exit the application.
Site Menu
The Site menu provides the following options:

| Menu Option | Description |
|---|---|
| Events | Configure system events, such as when to purge expired messages. |
| Information | View or edit site information, such as site name and contact phone number. |
| Profiles | Configure PBX connections, line access and outdial translations. |
| Security | Manage system passwords. |
| Tenants | Configure tenant settings, such as the auto attendant mailbox, operator extension and name formatting. |
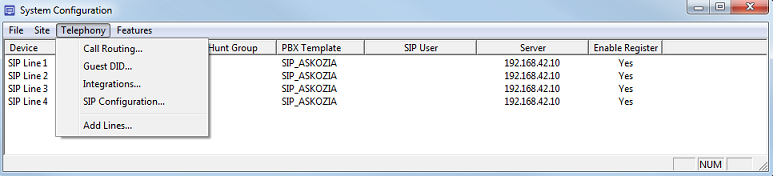
Telephony Menu
The Telephony menu provides the following options (some of which will vary depending on whether the system is running):
| Menu Option | Description |
|---|---|
| Call routing | Configure how calls are routed or processed based on the caller ID, called ID, or SIP information. |
| Guest DID | Manage the DID database for guest mailboxes. |
| Integrations | Create, edit, delete and import PBX integration templates. |
| SIP configuration | Configure the SIP configuration, including MWI routing. |
| Add lines | Use the Line Creation Wizard to add one or more voice lines. This option is hidden if the voice server is running. |
| Save line settings | Reloads all line-related settings into active memory (and, where relevant, into the voice board drivers). You should execute this action any time you edit line settings, Dialogic settings and/or PBX integration settings while the system is running. This option is hidden if the voice server is not running. |
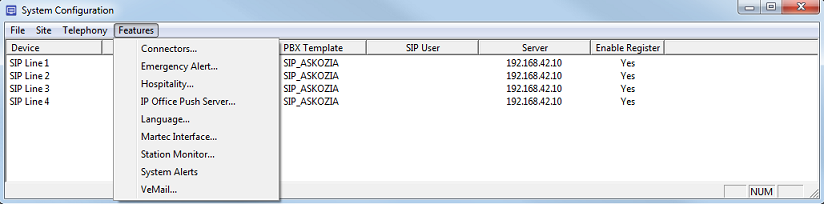
Features Menu
The Features menu provides the following options (some of which will not appear unless they have been licensed on your system):
| Menu Option | Description |
|---|---|
| Connectors | Configure connections to external services or devices, such as the inventory server. |
| Emergency alert | Configure the Emergency Alert service. This feature is only available for systems that integrate with an Avaya IP Office PBX with DevLink enabled. |
| Hospitality | Configure hospitality settings, including PMS link settings. |
| IP Office push server | Configure the push server. This feature is only available for systems that integrate with an Avaya IP Office PBX with TAPI enabled. |
| Language | Configure global language settings, such as date and time formats and the default language. |
| Martec interface | Configure the interface to a Martec emergency alert system. The Martec interface is an IVR add-on to the 7.00 that must be licensed separately. |
| Station monitor | Configure the station monitor service, if available. The station monitor is an add-on feature to the 7.00 that must be licensed separately. It can only be used to monitor analog phones on an Avaya IP Office PBX with CTI Pro and TAPI enabled. |
| System alerts | Configure email alerts based on system events, such as startup and shutdown. |
| VeMail | Configure the email server settings for VeMail notifications (also used for Email Notification). |
Context Menu
The main window also supports a context menu, accessed by right-clicking on one of the lines (if you right-click on a blank area, you will get the same menu but most items will be disabled because most of them require that a line be selected):
Note: If the system is running, the only menu item that will be shown is Open. All other actions require that the voice server not be running.
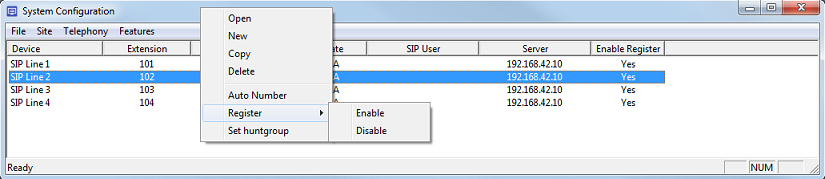
The following actions are available:
| Menu Item | Description |
|---|---|
| Open | Opens the line configuration dialog. If the system is running, the dialog is read-only. If the system is not running, you will be able to modify the configuration for the selected port. |
| New | Opens the Line Creation wizard so you can add one or more new lines. If you have already created the maximum number of lines allowed by your license, this will instead open a message box informing you of that fact. |
| Copy | Opens the Copy Line dialog, allowing you to add one or more new lines with most settings copied from the selected line. The extension number will be auto-set to one digit higher than the extension of the line you copied from; however, if that line's extension number is blank, then the new port's extension will be blank by default as well. In addition, the Register field will always be disabled by default. |
| Delete | Deletes a line (after asking for confirmation). |
| Auto Number | Resets the extension numbers of all selected ports, starting with the extension number you provide and incrementing by one for each line. This action requires you to select two or more lines; if only one is selected, an error message is displayed instead. |
| Register | Provides a sub-menu from which you can select to Enable or Disable SIP registration for the selected line (that is, whether it will auto-register with the PBX when the system starts up). |
| Set huntgroup | Allows you to change the hunt group for multiple lines at once (without having to manually configure each line individually). This action requires you to select two or more lines; if only one is selected, an error message is displayed instead. |
Line Configuration
To configure a line, select Open from the context menu or just double-click on it. This will open the Line Configuration dialog for that line, as shown below. Adding a new line via the New action on the context menu will open this dialog as well, but with all settings blank. The title bar displays the line number that is being edited.
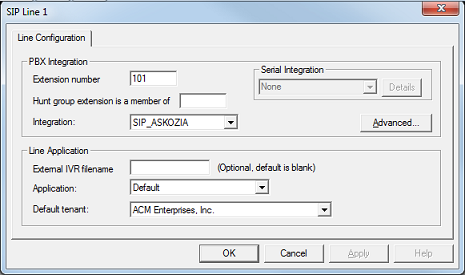
PBX Integration settings include:
| Setting | Description |
|---|---|
| Extension number | Extension number assigned to this line. For SIP systems, this is required for the integration to work. |
| Hunt group | Hunt group associated with the assigned extension. For SIP systems, this is required for the integration to work. |
| Integration | PBX template assigned to this line. |
| Serial integration | Serial integration assigned to this port. This is a read-only setting provided for convenience. What serial integration is used, if any, is set by the PBX integration template. This setting is not relevant for SIP systems. Click on the Details button to open the Serial Integration Details dialog to view and edit the Port ID, which by default is auto-set to the line number padded to four digits with leading zeros (e.g., line 1 would have Port ID 0001, line 2 would be 0002, and so forth). In most cases, the default setting is what you want, but you can change it if you need to. If the serial integration is set to None, the Details button is disabled. The other two settings can only be configured when editing the PBX template directly. |
| Advanced | Click this button to edit advanced Dialogic settings. Care should be taken in changing any of these values. |
The Line Application settings include:
| Setting | Description |
|---|---|
| External IVR filename | Reserved. Leave this field blank. |
| Application | Application to run on this port. There are two options; in almost all cases, choose Default.Default : Select this option for normal processing of inbound calls and outbound notifications. This is the default setting. Patient Reminder : Select this option if the system is licensed for the Patient Reminder IVR and you want to dedicate this line to that process. Any line assigned the Patient Reminder application will not accept incoming calls and will not process outbound notifications (except those of the patient reminder IVR itself). |
| Default tenant | Indicates which tenant's auto attendant will receive calls that are not directly routed to specific mailbox. |